Pages

Sunday, July 19, 2015

mirror mirror on the wall

My friend Carol.  Man.  That girl is full of inspiration.  And energy!

When she made this design board for my guest bathroom, I fell instantly in love.


My only problem was the cost.  We hadn't originally planned to update that guest bathroom.  Suddenly we were adding cost to the mounting remodel cost.  We had already been blindsided by a new HVAC system at the tune of $6,000 and water in our breakfast room air ducts which resulted in a new french drain.  Oh!  A french drain?  Would you like the $4,000 model or the $1,500 one?  Either way, it was money we hadn't planned to spend.  

So I tried to create Carol's beautiful bathroom, but it fell short.  The shower curtain came in and it was 6 inches too long.  Cue new curtain.  The cute pink rug was really expensive.  Cue pink bath mat from Bed Bath and Beyond.  The beautiful mirror?  Ix-nayed by the hubs.  I was trying.  But I just couldn't pull off the darling bathroom on the inspiration board.

We did find the tile at a price we could stomach and installation wasn't that much more, considering they were already there to install the kitchen tile.  So we took the plunge.  BEST DECISION.  The floor makes the bathroom!


I also FINALLY and ON A WHIM found the knobs I'd been searching for for MONTHS at Hobby Lobby.  {{{swooooon}}}


And I settled into this bathroom redo with some satisfaction.  I wasn't done yet, but I was okay with what I stared at each time I walked to my bedroom.

UNTIL.  One day I went antique shopping with that now-famous friend, Carol.  I was telling her that I loved the idea she had given me for updating my mirror with cedar wood planks.  I'm good with a saw, but I'm not a master angle cutter.  I don't have a table saw!

And then she did it once again.  She told me I didn't need angles! (What?? I'm a little {ok maybe a lot} OCD and tend to a be a box thinker. You mean I could do this with straight lines??)

I went straight home that day and started measuring.

I went to Lowe's where they cut the wood for me. (Did you know they'll do that??  YES! For free!)


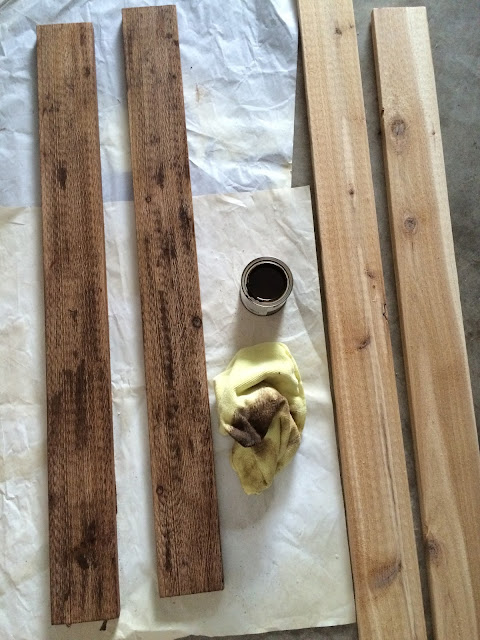
I brought those babies home and stained them right up!  And then with a little liquid nails and the resolve of a woman in need of new shoes, I MADE THAT THING HAPPEN.


Now, what you see here are the two sides of a cedar wood.  I stained both to see which look I preferred.  I used the rough side but either are beautiful, really.

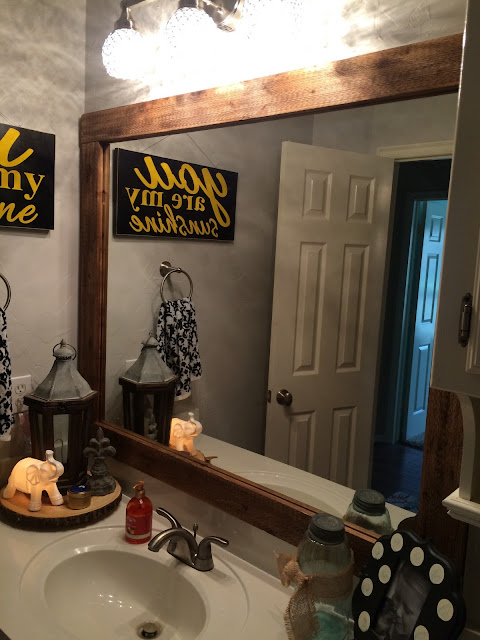
Once I had them up, I taped them down with painters tape to keep them in place overnight.  I glued the wood directly onto the mirror.  And voila!  In the morning it was like a new room.  


Then I added this bench and crate I found in a vintage store in OKC and BOOM.  Room done.  For now.....


Monday, July 13, 2015

vanilla anyone?

I'm doing it again!  I'm making homemade vanilla.


I've done this before on my blog, but it's been some time now and it was on my old blog!  So now that we're having to think ahead for Christmas gifts, I'm sharing it with you here.  Let's get working!

A few notes before we begin:
1. Making homemade vanilla is extremely easy, but not super fast in prep time.  Be prepared to spend some time on this.... maybe an hour?  Ok, pretty fast, but not that fast.

2. Patience, grasshopper.  It will steep for 6 months.  Don't start this if you need vanilla in 2 months.  It won't be ready.  This is why we prepare for Christmas in July.  :)

3. Vanilla beans come in all types.  I have done this enough to have a preference.  Bourbon.  I'm not a fan of Tahitian or Madagascar beans.  But you can choose whichever sound yummy to you!  That's the best part!

4. All vodka is created equal.  Buy the cheap stuff.  Trust me on this.  One year I got the pricey stuff to see if it was superior and guess what.  It was not.  Don't waste your money on that.  Put your money into the cute labels you'll be buying later on etsy.

5. When it's time to harvest your vanilla from the gallon jar, you'll need brown glass jars.  This protects your vanilla for long lasting use.  You can get those here if you'd like.

6. The total cost on these jars in the end will amount to about $8 each, between the vodka, beans, jars, and labels.  This isn't a cheap project, but it IS a great gift to give friends any time of year!  And they love to receive them!

7. And last, what we're making here is not a vanilla extract.  It's technically a vanilla marinade, because we are not extracting the beans, we are steeping them.  The great thing about this method is that you can use this for more than just baking!  This vanilla can be added to a coke or ice cream!  It will have those yummy little flecks of bean in it.  So don't freak out when you see them later.  ;)

OKAY!  We're ready to start!

You will need:
1 gallon jar with a lid
3/4 pound of vanilla beans (I buy mine on amazon)
2 half gallons of vodka
scissors
yields: 13- 8 oz. bottles of vanilla

You will begin cutting your beans from the bottom up until you nearly reach the end.  Don't cut them completely in half.


Drop these into the gallon jar.


Now you're almost done!  Poor in those bottles of vodka and close the lid.  Place that wonderful gallon of yumminess-in-the-making into a cool dry place in your kitchen and walk away.

Each month between now and December, you should come back to that fun jar and invert it a few times.  Then put it back again and walk away.  You'll note that each month the liquid will get darker and darker.  It's working!  And do you know why?  When you sliced those babies up, it exposed the flecks of vanilla inside the bean.  Did you see it?


So, when you've allowed your vanilla to sit for 6 months, you can begin assembling your products.  Take 2-3 beans from the gallon jar and put them in each brown bottle.  Then pour the vanilla in with a funnel, slap your darling label on, maybe a ribbon or two, and voila!  You're done!  Let the gift giving begin.  And don't forget to save a bottle for yourself!

 oops.  looks like i'm in need of a refill!